IPUpdate v2.1
IPUpdate is an IP addresses client update. The main program possibilities are the following:
- If you want to build your HTTP, FTP or POP3/SMTP server but you don't have static IP address, IPUpdate lets you to update your IP address in your domains when your external IP changes.
- If you want to notify your new IP address to a program, web service, etc, IPUpdate does these tasks for you automatically in the background.
News from 2.1 version:
- Added a small built-in webserver to control and setup IPUpdate from Internet or from a local network with a simple web-browser.
- Possibility to set the HTTP request timeout (before, it was fixed: 60 seconds).
- When the Internet connexion falls or the program can't locate the IP service, the tray program icon (next to the system clock) becomes very showy (red).
Bugs fixed in 2.1 version:
- Solved the crash when reaching the timeout.
- Other minor bugs.
INDEX:
Getting started with IPUpdate
The first time you run IPUpdate, it lets you to setup the program. Once you have made the first program setup, the next time you run it, the IP checking service will start automatically.
Setting up IPUpdate
IPUpdate updates the IP address in Internet making HTTP standard calls inserting somewhere in the URL address your new IP address. The calls usually returns a response according to the result, response that is used by IPUpdate to evaluate if the update was successful, otherwise, lets you to do some retries.
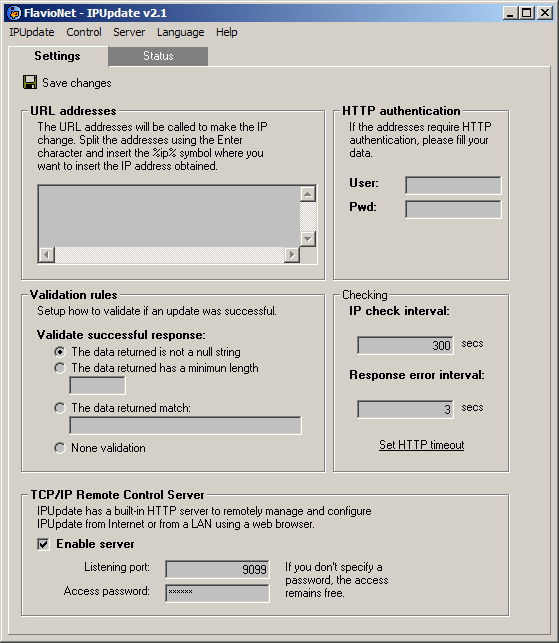
To define the URL addresses IPUpdate will call when your IP address changes, type in the textbox under the frame named "URL addresses" a URL address per line. Somewhere in the URL address, type the symbol %ip%, it will be replaced with you new IP address to make the HTTP call.
To verify if the update was successful, you can define what rule to use:
- The data returned is not a null string: If the response from the server is a null string (absolutely none data), IPUpdate will try to make some retries.
- The data returned has a minimum length: IPUpdate will check the length (in characters) of the source code of the data returned by the server. If the length of the data returned is not over the value specified, IPUpdate will begin to do retries.
- The data returned match: IPUpdate will check if the data returned by the server match the master text. Otherwise, it will begin to do retries.
- None validation: IPUpdate won't do any further action to check if the update was successful.
If the specified URL address calling require basic HTTP authentication, type your user name and password in the correct boxes, if not, clear them.
Last of all, you can setup the IP address checking interval (in seconds) and the retry by error interval (in seconds).
To save the changes, clic in the button "Save changes".
Setup IPUpdate from network
The most important new feature in IPUpdate 2.1 is the possibility of setup the program from network using a web-browser thanks to the small built-in webserver. To be able to use this great function, you have to setup from the IPUpdate's settings interface the server settings.
Clic on the tab Settings. If the settings doesn't fit in the window, scroll down till bottom using the scrollbars to see the frame named TCP/IP Remote Control Server.
To enable the server, check the box Enable server. Doing that, the server will start listening automatically on the program start-up.
Then you have to setup:
- The listening port: you have to define the port the server will listen to. By default is the # 9099. The most recommended is keeping the default port number, unless this port interfere with another service of your server.
- Access password: define the password to access to the server settings. If you don't specify any password, the access remains free (using any password you will be able to enter to the settings page).
To stop or start the server manually, you can use the commands Start and Stop from the menu Server.. The built-in settings server from IPUpdate binds to all local addresses available in your server (if you server has more than one network interface).
Server notes:
- If you use a router to access to Internet, enabling the server is secure because by default the server locks all the input ports. Probably, if you have setup your HTTP server already, you have opened the HTTP port (usually 80). If you want to access the network settings from Internet (outside your local network), you will have to open the port you specified in the server settings (usually 9099). Note that, to your safety, it's very important to specify a password, and, the more complicated password, the better.
- The server only lets one user at time to setup settings in the server. Once one user logs into the server, this keeps his IP to refuse other users log in when this user is changing settings at the server.
- If a user closes the webbrowser without logging off, other user, using the same computer, will be able to enter the settings server without using any password. So it's very important to remember logging off before closing the navigator.
- If other user with password tries to log in but he couldn't due to other user forgot to log off, the administrator can log him off using the option Force close open sessions from the menu Server to close the logged in users and letting other users to log in normally.
To setup the server from network:
- To get started, type the IP local address of your server, or the domain name of your server if you are accessing from Internet, followed by a colon and the selected port, 9099 by default.
Example: http://200.10.10.2:9099
Then, in the webbrowser, will appear the next screen. If you specified a password, enter it in the box, otherwise, leave it blank. Then, clic in Log In or simply Enter.
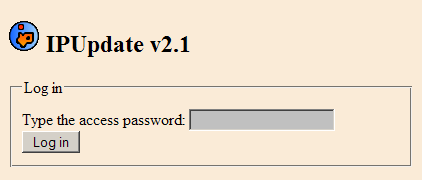
- Then, will appear a log in comfirmation screen, then click in Continue.
- Will appear the main settings screen.
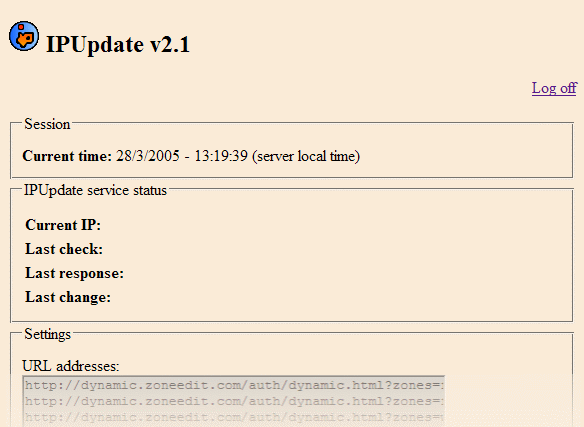
Don't forget to clic in the hiperlink Log off when you finish making the necessary operations.
Will appear different sections:
- Session: It lets you to know the local date and time from the server.
- IPUpdate services status: Show the informative panels from the program's interface (in the Status tab).
- Settings: Lets you edit the URL addresses, the wait intervals, retries, timeouts... It's necessary to click in the "Save changes" button to send the changes to the server.
- Commands: lets you to start and stop the IP checking service, show and remove the log file.

Checking the update status
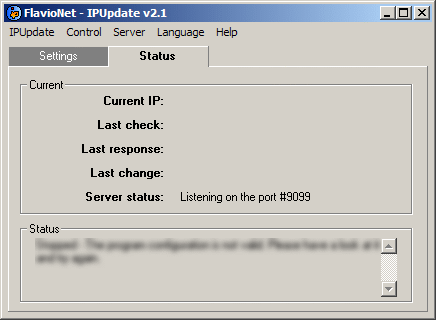
Clic in the Status tab to check the IP update status. This tab show the following information:
- Current IP: show the last IP found.
- Last check: show the date and time when the last check was done.
- Last response: show the data returned from the last server. To see all responses from the server, please see the full log file.
- Last change: show de date when the IP address changed for the last time.
- Server status: show the current TCP/IP remote control server status.
- Status: show information about the current processes. All the messages shown in the box (except the time left for the next check), are appended to the log file. It can show different information.
- Waiting for the next check. {x} seconds left: Denotes that the IP was checked and show the time left for the next check.
- Stopped - Checking aborted by user: You clicked in Control > Stop and the checking service was stopped.
- IP Check: It hasn't changed: The IP checking was finished but the IP is the same to the last time.
- Update successfully in all addresses. The IP is updated by calling all the URL addresses specified.
- Update successfully in {URL}. The IP address is updated in the current URL specified.
- Critical error: the IP service did not found or your Internet configuration forces you to connect through a proxy: The service used to detect the IP address from outside your networkwas not found. The service used is http://checkip.dyndns.org:8245/. The error can have been raised because of:
- The Internet connexion is not available at this moment.
- The IP checking service is fallen or it doesn't answer.
- You are accessing Internet throught a proxy. To change de HTTP proxy access, open Internet Explorer and select Tools > Internet options... In the Connectionstab, clic at the bottom of the window in the LAN settingsbutton. In the new window, uncheck the first box in the Proxy serverframe.
- IP Change: The IP address has changed. In this moment, the update process begins.
- Error: the returned string is null: You selected the "null string" validation and the current URL fell in the filter.
- Error: the returned string hasn't the minimum specified length: You selected the "minimum length" validation and the current URL fell in the filter.
- Error: the returned string doesn't match the master string: You selected the "match string" validation and the current URL fell in the filter.
- Stopped - The program hasn't been setup yet!: First setup the program before starting the service.
- Stopped - The program configuration is not valid.: Any of the setting of the program are wrong or hasn't been filled. More precise error messages will be poped up in the screen.
Checking the events histroy: the log file
IPUpdate saves in its directory the file IPUpdate.log. This file contains all messages shown in the status box with the date and time when them were raised. By this way, you can check at what time the IP address changed someday, possible errors when updating IP addresses, etc. To see the full log file, you can send the file IPUpdate.log to the NotePad or clicking in Control > Open full log. This action will open the full log file using the NotePad.
The menus
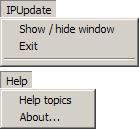
- Show / hide window: Lets you to hide the main window. To show it again, double-click the the IPUpdate tray icon (next to the system clock) or right-click the tray icon and select the same menu.
- Exit: Exits from IPUpdate stopping the service.
- Help: Show this help file.
- About: Show information about the author, the program version, the contact author address and the website for the updates.

- Start: Begins the IP checking service.+
- Stop: Stops the IP checking service. The service will be stopped when the current updates are finished.
- Open full log. Sends the log file to NotePad.
Notes and contact
- Why obtaining the IP address from outside your local network? Not always the IP of the local computer is same that the IP from the outside (the visible IP from Internet). It usually happens when using xDSL routers, etc). Using a IP checking service outside the local computer, the IP obtained is the IP visible from the outside.
IPUpdate was developed by Flavio González Vázquez. You can contact me writing a e-mail to flavio@ya.com. Also you can visit my website www.flavionet.com, mainly in spanish, but the most important products are in english too. You can also download other free interesting software from Flavionet factory.
|


